CapCut Dark Aesthetic Master Settings (2026) | Complete Guide: The Ultimate Faceless Video Blueprint
If you’re looking for the CapCut Dark Aesthetic Master Settings (2026) to create cinematic faceless videos, this guide covers everything you need.
Creating a successful faceless video in 2026 isn’t just about having a good script. It’s about making viewers feel something within the first few seconds. Whether you’re producing motivational edits, relationship advice, psychology facts, luxury lifestyle videos, or cinematic storytelling, your editing style can determine whether someone watches until the end or scrolls away instantly.
One editing trend has continued to dominate across YouTube Shorts, Instagram Reels, TikTok, and Facebook Reels—the dark aesthetic. This style blends cinematic colors, dramatic contrast, subtle motion effects, and immersive sound design to create videos that immediately grab attention. Instead of overwhelming viewers with bright colors and flashy transitions, dark aesthetic edits create mystery, emotion, and depth.
If you’re new to cinematic editing, you may also like our complete guide on Best CapCut Export Settings for YouTube Shorts. : CapCut Dark Aesthetic Master Settings (2026) | Complete GuideThe best part? You don’t need expensive editing software like Adobe Premiere Pro or DaVinci Resolve. CapCut has evolved into one of the most powerful free video editors available for both mobile and desktop users. With the right settings, you can produce professional-quality videos that look like they were edited in high-end software.
This complete guide explains the best CapCut dark aesthetic master settings (2026), including project setup, color grading, export quality, audio optimization, and professional editing techniques that help creators improve watch time and audience retention.
Why Dark Aesthetic Videos Dominate in 2026
Dark aesthetic videos aren’t just visually attractive—they’re strategically designed to capture and hold attention. In today’s short-form content landscape, where viewers decide in just a few seconds whether to continue watching, every visual element matters. A darker cinematic look creates contrast against the bright, colorful content filling most social feeds, making your videos stand out naturally.
Another reason this style performs so well is its emotional impact. Humans are naturally drawn to contrast, shadows, and dramatic lighting because these elements create curiosity and tension. A well-edited dark aesthetic video often feels more premium, polished, and emotionally engaging than a standard edit. This perception encourages viewers to stay longer, increasing average watch time and boosting the likelihood that the platform’s algorithm recommends your content to more people.
Dark aesthetic editing is particularly effective for niches such as:
- Motivational videos
- Relationship advice
- Self-improvement
- Psychology facts
- Luxury lifestyle
- Business and finance
- History documentaries
- AI-generated storytelling
- True crimeStoicism
- Horror stories
- Deep life lessons
For faceless creators, this editing style offers another advantage: it shifts attention away from the creator’s identity and focuses entirely on the story, visuals, and message. When paired with strong narration and engaging captions, dark aesthetic videos often feel more immersive than traditional talking-head content.
The Psychology Behind Dark Aesthetic Content
Successful creators understand that editing isn’t just about making videos look beautiful—it influences how viewers feel. Dark tones create a sense of mystery and seriousness, encouraging viewers to keep watching to discover what happens next. This psychological effect is one reason cinematic movie trailers often use darker color grading and dramatic music.
Lower brightness also helps subtitles stand out, making it easier for viewers to follow the content without straining their eyes. Since many people watch videos without sound, clear captions combined with dark backgrounds significantly improve accessibility and retention.
Another psychological factor is perceived quality. Videos with consistent color grading, balanced contrast, and smooth transitions often appear more professional, increasing trust in the creator and making viewers more likely to engage, subscribe, or share the content.
Why Faceless Creators Prefer This Editing Style
Faceless channels have become one of the fastest-growing categories on YouTube and TikTok because they allow creators to build successful brands without appearing on camera. This approach saves time, protects privacy, and makes it easier to scale content production.
Dark aesthetic editing complements faceless videos perfectly. Instead of relying on facial expressions or personal branding, creators use visuals, storytelling, music, and typography to create emotional connections with viewers. Slow zooms, cinematic overlays, subtle film grain, and carefully timed transitions transform ordinary stock footage into compelling visual stories.
Whether you’re using AI-generated images, stock videos, or your own footage, a consistent dark aesthetic helps establish a recognizable style. Over time, viewers begin associating that visual identity with your channel, strengthening your brand and encouraging repeat engagement.
What Is a Dark Aesthetic Video?
A dark aesthetic video is much more than reducing brightness or applying a black filter. It’s a carefully balanced combination of lighting, contrast, color temperature, motion, typography, and audio. The goal is to create a cinematic atmosphere while keeping every important element visible and engaging.
Professional editors rarely rely on a single filter. Instead, they manually adjust multiple settings to maintain detail in shadows while enhancing highlights and contrast. This creates depth without making the footage look muddy or underexposed. Small adjustments often have a bigger impact than dramatic edits, which is why experienced creators focus on subtle refinements rather than extreme effects.
The overall mood should feel intentional. Every transition, caption animation, sound effect, and color choice should support the story being told. When these elements work together, viewers experience a polished video that feels immersive from beginning to end.
Essential Visual Elements
A professional dark aesthetic edit typically includes:
| Element | Purpose |
|---|---|
| Low exposure | Creates mood |
| Moderate contrast | Adds depth |
| Slight desaturation | Produces a cinematic look |
| Cool temperature | Enhances mystery |
| Film grain | Adds texture |
| Motion blur | Smooths movement |
| Vignette | Focuses attention |
| Bold captions | Improves readability |
| Emotional music | Builds atmosphere |
| Smooth transitions | Maintains pacing |
The key is balance. Too much contrast can hide details, while excessive darkness can make your content difficult to watch. Aim for a clean, cinematic appearance that enhances the story rather than distracting from it.
Common Editing Mistakes
Many beginners believe darker always means better. In reality, over-editing is one of the biggest reasons videos look unprofessional. Lowering brightness too much can eliminate important details, especially on mobile screens. Likewise, oversharpening creates artificial edges that reduce overall quality.
Another common mistake is applying multiple heavy filters simultaneously. This often results in inconsistent colors and unnatural skin tones if people appear in the footage. Instead, start with manual adjustments and use filters only to enhance the final look.
Finally, avoid using every available transition or animation. Simplicity often appears more professional than excessive visual effects.
Best CapCut Project Settings (2026)
Before editing begins, it’s essential to configure your project correctly. Starting with the proper settings ensures smoother editing, better visual consistency, and higher export quality. Many creators spend hours perfecting color grading only to lose quality because their initial project settings weren’t optimized.
Canvas Size & Aspect Ratio
Different platforms require different aspect ratios.
| Platform | Resolution | Aspect Ratio |
|---|---|---|
| YouTube Shorts | 1080 × 1920 | 9:16 |
| TikTok | 1080 × 1920 | 9:16 |
| Instagram Reels | 1080 × 1920 | 9:16 |
| Facebook Reels | 1080 × 1920 | 9:16 |
| YouTube Long Videos | 1920 × 1080 | 16:9 |
For faceless creators focusing on short-form content, 1080 × 1920 (9:16) remains the industry standard. This format fills the entire mobile screen, maximizing visual impact and reducing distractions.
Frame Rate
Choosing the correct frame rate depends on your original footage.
Recommended Settings
- 60 FPS for smooth motion
- 30 FPS if the source footage was recorded at 30 FPS
Exporting 30 FPS footage at 60 FPS doesn’t magically improve quality. Instead, it can create unnecessary duplicate frames that make movement appear unnatural. Match your export frame rate to your source whenever possible.
Timeline Organization
Professional editors save time by organizing their timeline before adding effects.
A simple workflow includes:
- Import all footage.
- Remove unnecessary clips.
- Arrange scenes according to the script.
- Add voice-over.
- Insert background music.
- Apply color grading.
- Add captions.
- Include transitions and sound effects.
- Review the full video.
- Export using optimized settings.
Keeping clips between 2–4 seconds helps maintain pacing and improves viewer retention, especially on short-form platforms where attention spans are limited.
Master CapCut Color Grading Settings (2026)
Color grading is the heart of every cinematic dark aesthetic video. While transitions, animations, and sound effects certainly add polish, it’s the color treatment that gives your content a recognizable visual identity. A good color grade creates emotion, guides the viewer’s attention, and helps maintain consistency across every video you publish. If you want your audience to recognize your content instantly while scrolling, mastering these settings is essential.
One of the biggest mistakes beginners make is dragging every slider to the extreme. Professional-looking videos rarely use dramatic adjustments. Instead, they rely on subtle refinements that work together to create a balanced image. Your goal isn’t to make the footage as dark as possible—it’s to make it look cinematic while preserving important details in the highlights and shadows. Always preview your edits on full screen before exporting to ensure text remains readable and subjects stay visible.
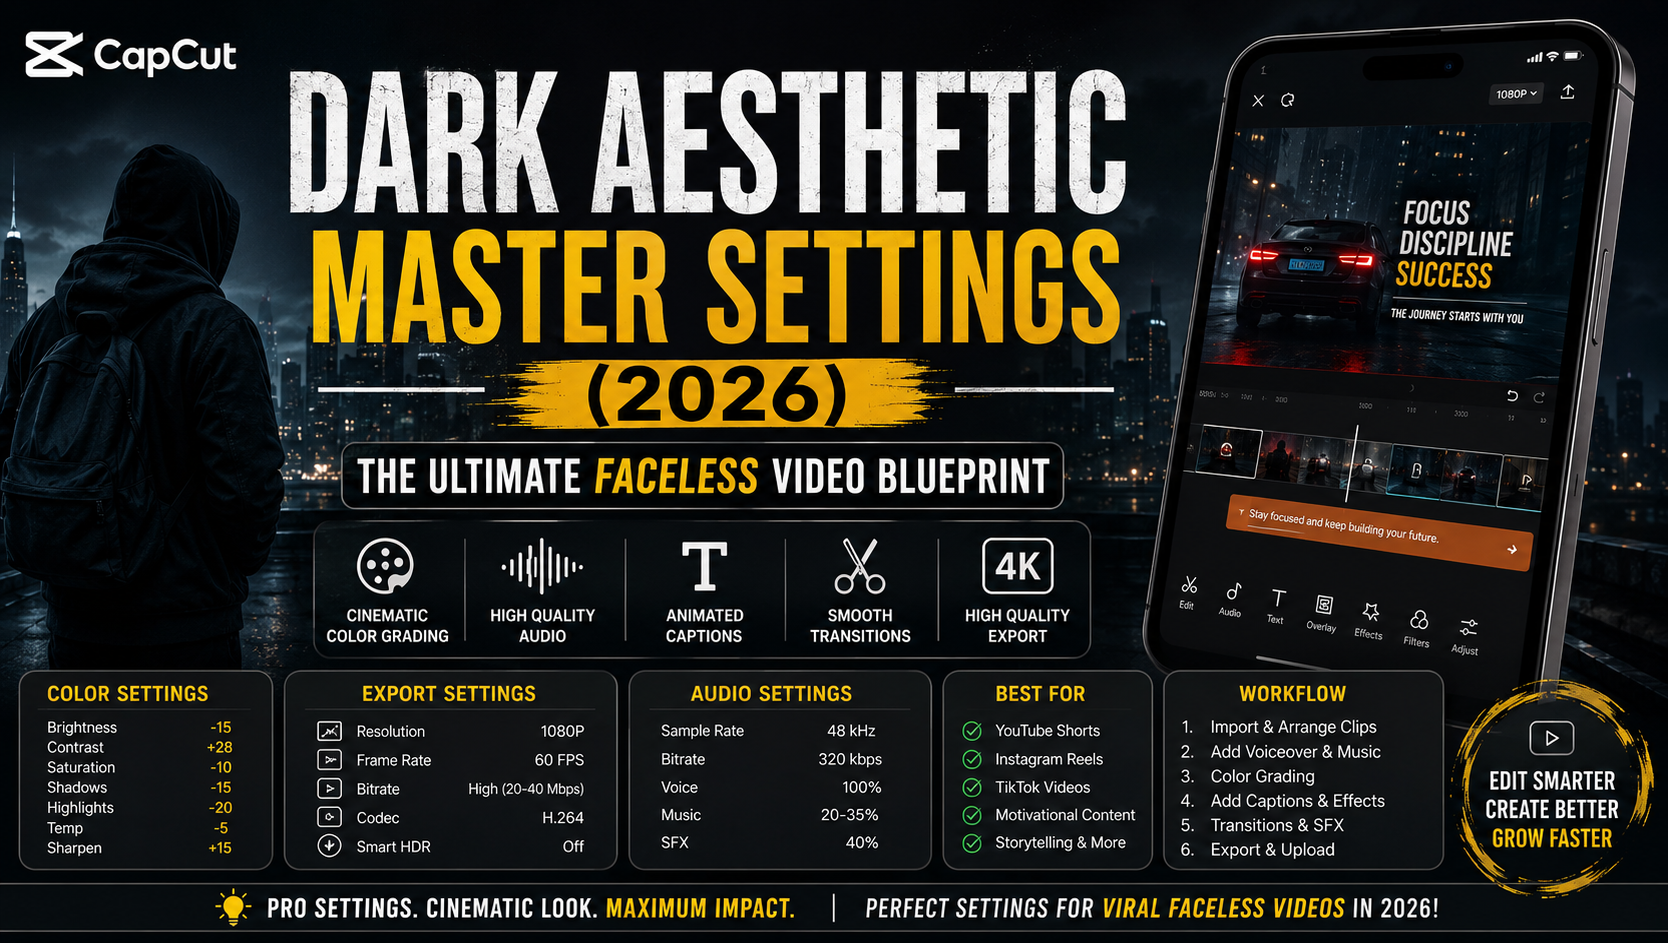
Recommended Manual Color Adjustments
Use these values as a starting point. Every clip is different, so make small adjustments depending on your lighting and footage.
| Setting | Recommended Value | Purpose |
|---|---|---|
| Brightness | -10 to -20 | Creates a darker mood |
| Contrast | +20 to +35 | Adds depth and separation |
| Saturation | -5 to -15 | Produces a cinematic feel |
| Exposure | -5 | Keeps details visible |
| Highlights | -20 | Prevents bright areas from blowing out |
| Shadows | -15 | Adds dramatic depth |
| Sharpen | +10 to +15 | Improves clarity |
| Fade | 5–10 | Softens harsh digital edges |
| Temperature | -5 | Creates cool, moody tones |
| Tint | 0 | Adjust only if color correction is needed |
These settings work particularly well for:
- Motivational videos
- Relationship content
- Stoicism edits
- Psychology facts
- Luxury lifestyle videos
- Faceless storytelling
- AI-generated cinematic videos
After applying these adjustments, watch the entire video once before making further edits. Small changes often produce a more professional result than aggressive corrections.
How to Match Multiple Clips
One challenge many creators face is maintaining consistent colors across different footage. Stock videos, AI-generated clips, and smartphone recordings often have different brightness levels and color temperatures. If left uncorrected, these differences become distracting.
Start by selecting your best-looking clip as the reference. Adjust all remaining clips to match its brightness, contrast, and temperature rather than editing each one independently. If you’re working with AI-generated images, reduce saturation slightly to create a more realistic appearance. Consistency across your timeline makes your final video feel intentional and polished, even when it combines footage from multiple sources.
Best CapCut Filters for a Dark Aesthetic
Manual adjustments should always come first, but CapCut’s filters can add the finishing touch. Rather than relying on a filter at full strength, apply it lightly to enhance your manual edits. Most professional creators reduce filter intensity to avoid an artificial look.
The following filters consistently produce excellent results:
| Filter | Best For | Recommended Intensity |
|---|---|---|
| Movie | Cinematic edits | 20–30% |
| Cinema | Storytelling | 25–35% |
| Moody | Relationship videos | 20–30% |
| Black Gold | Luxury content | 25–40% |
| Retro Film | Documentary style | 20–30% |
| Portrait Dark | Close-up footage | 20–30% |
Best CapCut Export Settings (2026)
Many creators spend hours perfecting a video only to lose quality during export. Compression, incorrect frame rates, and low bitrates can all reduce sharpness. Export settings are just as important as editing because they determine what viewers actually see after uploading your content.
Read more: CapCut Dark Aesthetic Master Settings (2026) | Complete Guide Turn Blurry Images Into 4K Using CapCut AI (2026 Guide): CapCut Dark Aesthetic Master Settings (2026) | Complete GuideThink of exporting as packaging a premium product. Even the best content can look disappointing if it’s compressed incorrectly. By choosing the right settings, you preserve detail, maintain smooth motion, and improve compatibility across platforms.
Recommended Export Settings
| Setting | Recommended Value |
|---|---|
| Resolution | 1080P |
| Optional Resolution | 4K (only for native 4K footage) |
| Frame Rate | 60 FPS |
| Bitrate | High (20–40 Mbps if available) |
| Codec | H.264 |
| HDR | Only when source footage is HDR |
| Smart HDR | Off |
| AI Upscaling | Only for low-resolution footage |
Should You Export in 4K?
Exporting in 4K sounds impressive, but it only provides benefits if your original footage was recorded in 4K. Upscaling a 1080P project rarely improves image quality and simply increases file size. For YouTube Shorts, TikTok, Instagram Reels, and Facebook Reels, 1080 × 1920 remains the best balance between quality and upload speed.
Choosing the Right Codec
CapCut typically offers H.264 and, on some devices, H.265.
| Codec | Advantages | Best Use |
|---|---|---|
| H.264 | Maximum compatibility | YouTube, TikTok, Instagram |
| H.265 | Smaller file size | Storage and supported devices |
Unless you have a specific reason to reduce file size, H.264 is the safest option because it’s supported across nearly every platform.
Professional Audio Settings
Great visuals attract viewers, but great audio keeps them watching. Poor sound quality can make even the most beautiful edit feel amateurish. Viewers are surprisingly forgiving of average video quality, but they quickly abandon videos with distorted narration or overpowering music.
A professional audio mix prioritizes clarity above everything else. Background music should enhance the mood, not compete with your voice-over.
Recommended Audio Settings
| Setting | Recommended Value |
|---|---|
| Sample Rate | 48 kHz |
| Audio Bitrate | 320 kbps |
| Voice Volume | 100% |
| Music Volume | 20–35% |
| Sound Effects | 30–40% |
If your voice sounds too quiet, lower the music instead of increasing narration excessively. Balanced audio creates a more pleasant listening experience and improves viewer retention.
Best Fonts for Dark Aesthetic Videos
Typography plays a bigger role than many creators realize. Clear captions increase accessibility and help viewers follow your content even with the sound turned off. Choosing a clean, bold font also reinforces your brand identity.
Popular choices include:
- Bebas Neue
- Poppins Bold
- Montserrat
- Anton
- League Spartan
- Helvetica Bold
Keep captions large enough to read comfortably on a mobile screen, and avoid decorative fonts that reduce clarity.
Caption Style That Boosts Watch Time
Successful faceless creators don’t just add captions—they design them strategically. A simple, readable style keeps viewers engaged without distracting them from the visuals.
A recommended setup includes:
- White text
- Yellow keyword highlights
- Bold font weight
- Black shadow or outline
- Center alignment
- Smooth pop or fade animation
Highlighting one or two important words in each sentence naturally guides the viewer’s attention and emphasizes key ideas.
Motion Blur and Animation Settings
Smooth movement gives videos a premium feel. Motion blur softens rapid transitions and creates a more cinematic appearance when used carefully.
Recommended Motion Blur
- Intensity: Medium
- Direction: Automatic
Avoid excessive blur, as it can reduce sharpness and make text harder to read.
For animations, subtlety is key. Consider using:
- Fade
- Zoom
- Camera Push
- Slide Up
- Pop
- Drift
Keep animation durations between 0.3 and 0.6 seconds. Short animations maintain pacing without slowing the story.
Transition Settings
Transitions should connect scenes—not distract from them.
Recommended options:
- Dissolve
- Fade
- Blur
- Flash
- Pull In
- Camera Move
Set transition durations between 0.2 and 0.5 seconds for fast-paced short-form videos. Longer transitions can interrupt the flow and reduce viewer retention.
Complete Professional Editing Workflow
Creating a cinematic dark aesthetic video is about much more than applying a few filters. Professional creators follow a structured workflow that ensures every clip, sound effect, transition, and caption works together seamlessly. Having a repeatable editing process also saves time, especially if you’re publishing multiple Shorts or Reels each week. Instead of guessing what to do next, you move through a consistent sequence that produces reliable results.
A well-organized workflow also improves consistency across your channel. When viewers recognize your editing style, they begin associating that look and feel with your brand. This visual consistency builds trust and encourages people to watch more of your content.
Step 1: Organize Your Files
Before opening CapCut, create folders for:
- Video clips
- Voice-over recordings
- Background music
- Sound effects
- Images
- Logos
- Thumbnails
Keeping your assets organized prevents confusion during editing and speeds up your workflow.
Step 2: Build the Story First
Never start with effects.
Instead:
- Import all clips.
- Arrange them according to your script.
- Remove unnecessary footage.
- Keep only the strongest scenes.
Remember, viewers stay for the story—not the transitions.
Step 3: Add Voice-Over
Voice-over should be added before music and effects because it controls the pacing of the video.
A good narration should be:
- Clear
- Confident
- Natural
- Free from background noise
Pause naturally between important points to give viewers time to absorb the information.
Step 4: Add Background Music
Music creates emotion.
Choose tracks that match your content:
| Content Type | Music Style |
|---|---|
| Motivation | Cinematic orchestral |
| Relationships | Emotional piano |
| Luxury | Modern electronic |
| Horror | Dark ambient |
| Psychology | Soft cinematic |
| Business | Minimal corporate |
Reduce music volume so it supports your narration rather than overpowering it.
Step 5: Apply Color Grading
Once the timeline is complete:
- Adjust brightness.
- Increase contrast.
- Fine-tune saturation.
- Match all clips.
- Apply one subtle filter if needed.
Color grading should be the finishing touch, not the starting point.
Step 6: Add Captions
Most people watch short-form videos with the sound off.
Captions help by:
- Improving accessibility
- Increasing watch time
- Making key points memorable
- Encouraging viewers to stay engaged
Highlight important words using a contrasting color like yellow while keeping the main text white.
Step 7: Add Motion Effects
Subtle movement makes static clips feel alive.
Good effects include:
- Slow zoom
- Camera push
- Gentle pan
- Slight rotation
Avoid adding movement to every clip. Strategic motion has a much stronger impact.
Step 8: Add Transitions
Keep transitions short and purposeful.
Recommended duration:
0.2–0.5 seconds
Fast-paced videos rarely need flashy transitions.
Simple fades often look more professional.
Step 9: Review the Entire Video
Before exporting:
- Watch from beginning to end.
- Check spelling in captions.
- Ensure music isn’t too loud.
- Verify transitions are smooth.
- Remove awkward pauses.
- Fix timing issues.
Professional creators often watch the final edit twice before exporting.
Step 10: Export Using High-Quality Settings
Finally:
- Resolution: 1080P
- FPS: 60
- Codec: H.264
- Bitrate: High
Now your video is ready for upload.
Sound Effects That Increase Viewer Retention
Sound effects are often overlooked, yet they make videos feel dynamic and professional. A simple whoosh during a transition or a bass hit before a dramatic statement can dramatically increase viewer engagement. These sounds provide subtle cues that something important is happening, encouraging viewers to keep watching.
The key is restraint. Too many effects can overwhelm the audience and distract from your message. Use them to emphasize important moments rather than filling every second with audio.
Recommended Sound Effects
| Sound Effect | Best Use |
|---|---|
| Whoosh | Scene transitions |
| Bass Hit | Dramatic reveals |
| Click | Text animations |
| Camera Shutter | Photo effects |
| Rise | Building suspense |
| Impact | Important statements |
| Swipe | Quick transitions |
| Glitch | Tech and AI content |
Always place sound effects precisely where the visual change occurs. Even a slight delay can make the edit feel less polished.
Common Editing Mistakes to Avoid
Even experienced editors occasionally make mistakes that reduce the quality of their videos. Recognizing these issues early can save hours of re-editing and improve the final result.
One common mistake is using too many effects at once. Excessive filters, transitions, animations, and overlays can make a video feel cluttered rather than cinematic. Simplicity often looks more professional.
Another issue is inconsistent color grading. If one clip appears warm while the next is cool, viewers notice the inconsistency immediately. Matching your clips creates a seamless viewing experience.
Avoid These Mistakes
- Exporting with low bitrate
- Oversharpening footage
- Overusing filters
- Making videos too dark
- Using unreadable fonts
- Adding loud background music
- Overloading transitions
- Ignoring audio quality
- Using blurry source footage
- Keeping clips on screen too long
A clean edit almost always outperforms an overly complicated one.
Tips for Creating Viral Faceless Videos
Editing helps attract attention, but strong storytelling keeps viewers watching. Successful faceless creators combine compelling visuals with valuable content and a clear structure.
3 High-Retention TikTok Hook Scripts for Faceless Channels: CapCut Dark Aesthetic Master Settings (2026) | Complete GuideStart with a powerful hook in the first three seconds. Ask a question, present a surprising fact, or show an intriguing visual. Once you’ve captured attention, maintain momentum by changing scenes every few seconds and using captions to reinforce your message.
Consistency also matters. Uploading regularly helps platforms understand your niche and increases the likelihood of your content reaching the right audience.
Best Practices
- Hook viewers immediately.
- Keep clips short.
- Use emotional storytelling.
- Include readable captions.
- Maintain consistent branding.
- Use high-quality audio.
- End with a simple call-to-action.
- Post consistently.
Remember, editing supports the story—it doesn’t replace it.
How to Keep Viewers Watching Longer
Audience retention is one of the most important ranking factors for YouTube Shorts, TikTok, and Instagram Reels. If viewers watch most or all of your video, platforms are more likely to recommend it to others.
To improve retention:
- Change visuals every 2–4 seconds.
- Avoid long pauses.
- Add subtle zooms to static images.
- Introduce curiosity early.
- Answer the main question near the end.
- Finish with a memorable takeaway.
Think of your video as a journey. Every scene should encourage viewers to stay for the next one.
After perfecting your color grading and effects, learn how to preserve every detail during export with our Best CapCut Export Settings for YouTube Shorts (2026 Guide).
Optimizing Videos for Different Platforms
Although the same video can be uploaded to multiple platforms, small adjustments can improve performance.
| Platform | Best Length | Focus |
|---|---|---|
| YouTube Shorts | 20–60 sec | Storytelling & retention |
| TikTok | 15–45 sec | Fast pacing & trends |
| Instagram Reels | 20–60 sec | Visual quality |
| Facebook Reels | 30–90 sec | Shareable content |
Repurposing your content with platform-specific captions and hashtags can help you reach a wider audience without creating new videos from scratch.
How to Find Cinematic 4K B-Roll for Faceless Videos: CapCut Dark Aesthetic Master Settings (2026) | Complete Guide